RaspberryPiでマイク録音してみる【ヒミツのクマちゃん その2】

RaspberryPiでマイク録音してみる

前回のエントリでヒミツのクマちゃんが占いをしてくれるようになったので、今度は会話したくなってきました。そこでその第一歩としてRaspberryPiにマイクを接続しようと思います。

qiita.com

こちらの記事を参考にしています。

以下のマイクが実績があるとのことだったので購入することにしました。

値段的にはピン形状のマイク(アナログ)でもいいかなと思うのですが、ノイズが結構入るかなと思ったのでUSB接続にしました。

マイクを接続してみる。

マイクをUSBに接続してみてlsusbで認識状況を確認します。

【接続前】

$ lsusb
Bus 001 Device 006: ID 0a12:0001 Cambridge Silicon Radio, Ltd Bluetooth Dongle (HCI mode)
Bus 001 Device 005: ID 2019:1201 PLANEX
Bus 001 Device 004: ID 05e3:0608 Genesys Logic, Inc. USB-2.0 4-Port HUB
Bus 001 Device 003: ID 0424:ec00 Standard Microsystems Corp. SMSC9512/9514 Fast Ethernet Adapter
Bus 001 Device 002: ID 0424:9512 Standard Microsystems Corp. LAN9500 Ethernet 10/100 Adapter / SMSC9512/9514 Hub
Bus 001 Device 001: ID 1d6b:0002 Linux Foundation 2.0 root hub

【接続後】

$ lsusb
Bus 001 Device 007: ID 0d8c:0134 C-Media Electronics, Inc.
Bus 001 Device 006: ID 0a12:0001 Cambridge Silicon Radio, Ltd Bluetooth Dongle (HCI mode)
Bus 001 Device 005: ID 2019:1201 PLANEX
Bus 001 Device 004: ID 05e3:0608 Genesys Logic, Inc. USB-2.0 4-Port HUB
Bus 001 Device 003: ID 0424:ec00 Standard Microsystems Corp. SMSC9512/9514 Fast Ethernet Adapter
Bus 001 Device 002: ID 0424:9512 Standard Microsystems Corp. LAN9500 Ethernet 10/100 Adapter / SMSC9512/9514 Hub
Bus 001 Device 001: ID 1d6b:0002 Linux Foundation 2.0 root hub

比較すると一番上の行に以下のエントリが追加されていることがわかります。

Bus 001 Device 007: ID 0d8c:0134 C-Media Electronics, Inc.

以前使用していたUSBスピーカーもC-Media製だったような気がするのでC-Media製の音声デバイスって多いみたい。

何もしなくてもデバイスの認識はされたような感じですね。

通常であれば

/etc/modprobe.d/alsa-base.confを編集して、使用するオーディオモジュールの優先順位の変更して、RaspberryPiのリブート

の処理を行うことになるのですが、実は行わなくても録音は可能です。

alsaを使用して録音してみる。

基本的なテストはCLIalsaのコマンド群を使用することで確認ができます。

録音に使用できるデバイス一覧の確認

$ arecord -l
**** ハードウェアデバイス CAPTURE のリスト ****
カード 1: Device [USB PnP Audio Device], デバイス 0: USB Audio [USB Audio]
  サブデバイス: 1/1
  サブデバイス #0: subdevice #0

複数ある場合にはいくつかのデバイスが列挙できますが、今回は1つしか存在していないのでこのような表示になります。

ここで覚えて置かなければならなのは カード番号が1、デバイス番号が0であることです。

先程オーディオモジュールの優先順位を変更を飛ばしたといいましたが、デフォルト値ではなく、デバイス指定を行うので不要でしたということになります。

録音を行う

$ arecord -D plughw:1,0 test.wav
録音中 WAVE 'test.wav' : Unsigned 8 bit, レート 8000 Hz, モノラル
^Cシグナル 割り込み で中断...

wavファイルはデフォルトの設定で録音します(データは8bit、サンプリングレートは8kHzのモノラル)。 コマンドスイッチで-D plughw:1,0としている部分がデバイスを明示的にしている部分となります。明示的に指定しないとデフォルト値(デバイスの優先順位が高いものを)探しに行くので注意が必要です。

先程のarecord -lコマンドの結果で、「カード番号が1、デバイス番号が0」と検出されていたので、この値を-Dで渡しています。

再生する

再生に関しては以下となります。

$ aplay test.wav
再生中 WAVE 'test.wav' : Unsigned 8 bit, レート 8000 Hz, モノラル

録音のパラメータも正しく認識されているので問題ありません。

録音ボリューム調整

録音すると音量が小さいことがあります。その場合には以下で調整することになります。

$ amixer sset Mic 46  -c 1
Simple mixer control 'Mic',0
  Capabilities: cvolume cvolume-joined cswitch cswitch-joined
  Capture channels: Mono
  Limits: Capture 0 - 62
  Mono: Capture 46 [74%] [14.62dB] [on]

ここで-cで渡している番号カード番号となるので、arecord -lコマンドの結果で、「カード番号が1、デバイス番号が0」と検出されていたので、カード番号の1を渡し、-c 1となります。

最小は0で最大は62まで指定できるようです。

録音ボリュームの値を確認するだけであれば以下で確認できます。

$ amixer sget Mic -c 1
Simple mixer control 'Mic',0
  Capabilities: cvolume cvolume-joined cswitch cswitch-joined
  Capture channels: Mono
  Limits: Capture 0 - 62
  Mono: Capture 46 [74%] [14.62dB] [on]

これでデバイスの基本的な機能の確認ができました。

pythonから録音してみる

これからは毎度のことですが、いつも通りpythonから使用できるかを確認することになります。ネットを調べるとpyaudioというモジュールを使うと良さそうです。

people.csail.mit.edu

pipでインストールしてみる

ではpipコマンドを使用してインストールしてみます。

$ pip install pyaudio
Downloading/unpacking pyaudio
  Downloading PyAudio-0.2.9.tar.gz (289kB): 289kB downloaded
  Running setup.py (path:/tmp/pip-build-uNj4Vs/pyaudio/setup.py) egg_info for package pyaudio

    warning: no files found matching '*.c' under directory 'test'
Installing collected packages: pyaudio
  Running setup.py install for pyaudio
    building '_portaudio' extension
    arm-linux-gnueabihf-gcc -pthread -DNDEBUG -g -fwrapv -O2 -Wall -Wstrict-prototypes -fno-strict-aliasing -D_FORTIFY_SOURCE=2 -g -fstack-protector-strong -Wformat -Werror=format-security -fPIC -I/usr/include/python2.7 -c src/_portaudiomodule.c -o build/temp.linux-armv6l-2.7/src/_portaudiomodule.o
    src/_portaudiomodule.c:28:20: fatal error: Python.h: そのようなファイルやデ ィレクトリはありません
     #include "Python.h"
                        ^
    compilation terminated.
    error: command 'arm-linux-gnueabihf-gcc' failed with exit status 1
    Complete output from command /usr/bin/python -c "import setuptools, tokenize;__file__='/tmp/pip-build-uNj4Vs/pyaudio/setup.py';exec(compile(getattr(tokenize, 'open', open)(__file__).read().replace('\r\n', '\n'), __file__, 'exec'))" install --record /tmp/pip-RuGTpw-record/install-record.txt --single-version-externally-managed --compile:
    running install

running build

running build_py

creating build

creating build/lib.linux-armv6l-2.7

copying src/pyaudio.py -> build/lib.linux-armv6l-2.7

running build_ext

building '_portaudio' extension

creating build/temp.linux-armv6l-2.7

creating build/temp.linux-armv6l-2.7/src

arm-linux-gnueabihf-gcc -pthread -DNDEBUG -g -fwrapv -O2 -Wall -Wstrict-prototypes -fno-strict-aliasing -D_FORTIFY_SOURCE=2 -g -fstack-protector-strong -Wformat -Werror=format-security -fPIC -I/usr/include/python2.7 -c src/_portaudiomodule.c -o build/temp.linux-armv6l-2.7/src/_portaudiomodule.o

src/_portaudiomodule.c:28:20: fatal error: Python.h: そのようなファイルやディレ クトリはありません

 #include "Python.h"

                    ^

compilation terminated.

error: command 'arm-linux-gnueabihf-gcc' failed with exit status 1

----------------------------------------
Cleaning up...
Command /usr/bin/python -c "import setuptools, tokenize;__file__='/tmp/pip-build-uNj4Vs/pyaudio/setup.py';exec(compile(getattr(tokenize, 'open', open)(__file__).read().replace('\r\n', '\n'), __file__, 'exec'))" install --record /tmp/pip-RuGTpw-record/install-record.txt --single-version-externally-managed --compile failed with error code 1 in /tmp/pip-build-uNj4Vs/pyaudio
Traceback (most recent call last):
  File "/usr/bin/pip", line 9, in <module>
    load_entry_point('pip==1.5.6', 'console_scripts', 'pip')()
  File "/usr/lib/python2.7/dist-packages/pip/__init__.py", line 248, in main
    return command.main(cmd_args)
  File "/usr/lib/python2.7/dist-packages/pip/basecommand.py", line 161, in main
    text = '\n'.join(complete_log)
UnicodeDecodeError: 'ascii' codec can't decode byte 0xe3 in position 57: ordinal not in range(128)

エラー?

先程のサイトをみると

pip will download the PyAudio source and build it for your system. Be sure to install the portaudio library development package (portaudio19-dev) and the python development package (python-all-dev) beforehand. For better isolation from system packages, consider installing PyAudio in a virtualenv.

という記述が。インストール時にビルドするので事前にportaudio19-devpython-all-devのパッケージは事前に入れてねということみたいです。PyAudioはportaudioの機能を使用するモジュールなので確かに必要ですね。

今回はお手軽さを目指したいのでapt-getでインストールします。

apt-getでインストールしてみる

$ sudo apt-get install python-pyaudio python3-pyaudio

パッケージリストを読み込んでいます... 完了
依存関係ツリーを作成しています
状態情報を読み取っています... 完了
以下のパッケージが自動でインストールされましたが、もう必要とされていません:
  gyp libasn1-8-heimdal libc-ares-dev libc-ares2 libgssapi3-heimdal
  libhcrypto4-heimdal libheimbase1-heimdal libheimntlm0-heimdal
  libhx509-5-heimdal libjs-node-uuid libjs-underscore libkrb5-26-heimdal
  libroken18-heimdal libssl-dev libssl-doc libv8-3.14-dev libv8-3.14.5
  libwind0-heimdal rlwrap
これを削除するには 'apt-get autoremove' を利用してください。
提案パッケージ:
  python-pyaudio-doc
以下のパッケージが新たにインストールされます:
  python-pyaudio python3-pyaudio
アップグレード: 0 個、新規インストール: 2 個、削除: 0 個、保留: 181 個。
46.8 kB のアーカイブを取得する必要があります。
この操作後に追加で 194 kB のディスク容量が消費されます。
取得:1 http://mirrordirector.raspbian.org/raspbian/ jessie/main python-pyaudio armhf 0.2.8-1 [23.2 kB]
取得:2 http://mirrordirector.raspbian.org/raspbian/ jessie/main python3-pyaudio armhf 0.2.8-1 [23.6 kB]
46.8 kB を 1秒 で取得しました (30.8 kB/s)
以前に未選択のパッケージ python-pyaudio を選択しています。
(データベースを読み込んでいます ... 現在 129542 個のファイルとディレクトリがインストールされています。)
.../python-pyaudio_0.2.8-1_armhf.deb を展開する準備をしています ...
python-pyaudio (0.2.8-1) を展開しています...
以前に未選択のパッケージ python3-pyaudio を選択しています。
.../python3-pyaudio_0.2.8-1_armhf.deb を展開する準備をしています ...
python3-pyaudio (0.2.8-1) を展開しています...
python-pyaudio (0.2.8-1) を設定しています ...
python3-pyaudio (0.2.8-1) を設定しています ...

python3はまだ使用する気はないですが、一応入れます。

PyAudioで録音を行う

公式サイトのサンプルを実験してみます。

#!/usr/bin/env python
# -*- coding: utf-8 -*-

"""PyAudio example: Record a few seconds of audio and save to a WAVE file."""

import pyaudio
import wave

CHUNK = 1024
FORMAT = pyaudio.paInt16
CHANNELS = 2
RATE = 44100
RECORD_SECONDS = 5
WAVE_OUTPUT_FILENAME = "output.wav"

p = pyaudio.PyAudio()

stream = p.open(format=FORMAT,
                channels=CHANNELS,
                rate=RATE,
                input=True,
                frames_per_buffer=CHUNK)

print("* recording")

frames = []

for i in range(0, int(RATE / CHUNK * RECORD_SECONDS)):
    data = stream.read(CHUNK)
    frames.append(data)

print("* done recording")

stream.stop_stream()
stream.close()
p.terminate()

wf = wave.open(WAVE_OUTPUT_FILENAME, 'wb')
wf.setnchannels(CHANNELS)
wf.setsampwidth(p.get_sample_size(FORMAT))
wf.setframerate(RATE)
wf.writeframes(b''.join(frames))
wf.close()

これを実行させると…

$ python pyaudio_sample.py
ALSA lib pcm_dmix.c:1022:(snd_pcm_dmix_open) unable to open slave
ALSA lib pcm.c:2239:(snd_pcm_open_noupdate) Unknown PCM cards.pcm.rear
ALSA lib pcm.c:2239:(snd_pcm_open_noupdate) Unknown PCM cards.pcm.center_lfe
ALSA lib pcm.c:2239:(snd_pcm_open_noupdate) Unknown PCM cards.pcm.side
ALSA lib pcm.c:2239:(snd_pcm_open_noupdate) Unknown PCM cards.pcm.hdmi
ALSA lib pcm.c:2239:(snd_pcm_open_noupdate) Unknown PCM cards.pcm.modem
ALSA lib pcm.c:2239:(snd_pcm_open_noupdate) Unknown PCM cards.pcm.phoneline
ALSA lib pcm_dmix.c:1022:(snd_pcm_dmix_open) unable to open slave
Cannot connect to server socket err = No such file or directory
Cannot connect to server request channel
jack server is not running or cannot be started
Expression 'parameters->channelCount <= maxChans' failed in 'src/hostapi/alsa/pa_linux_alsa.c', line: 1514
Expression 'ValidateParameters( inputParameters, hostApi, StreamDirection_In )' failed in 'src/hostapi/alsa/pa_linux_alsa.c', line: 2818
Traceback (most recent call last):
  File "pyaudio_sample.py", line 19, in <module>
    frames_per_buffer=CHUNK)
  File "/usr/lib/python2.7/dist-packages/pyaudio.py", line 747, in open
    stream = Stream(self, *args, **kwargs)
  File "/usr/lib/python2.7/dist-packages/pyaudio.py", line 442, in __init__
    self._stream = pa.open(**arguments)
IOError: [Errno Invalid number of channels] -9998

おや?エラーになってしまいました。エラーメッセージをみるとbuffer関連でエラーが出ています。

  File "pyaudio_sample.py", line 19, in <module>
    frames_per_buffer=CHUNK)

いろいろ実験を行った結果録音のパラメータがハードウエアに対応していなかったりするとこのようなエラーがでるようです。そこでパラメータを以下のように変更してみます。

【冒頭の設定部分】

CHUNK = 1024 * 2
FORMAT = pyaudio.paInt16
CHANNELS = 1
RATE = 16000
RECORD_SECONDS = 5
WAVE_OUTPUT_FILENAME = "output.wav"

バッファのサイズを倍、チャンネル数をモノラル、レートを16kHzへ変更してみました。

再度実行を行うと

$ python pyaudio_sample.py
ALSA lib pcm_dmix.c:1022:(snd_pcm_dmix_open) unable to open slave
ALSA lib pcm.c:2239:(snd_pcm_open_noupdate) Unknown PCM cards.pcm.rear
ALSA lib pcm.c:2239:(snd_pcm_open_noupdate) Unknown PCM cards.pcm.center_lfe
ALSA lib pcm.c:2239:(snd_pcm_open_noupdate) Unknown PCM cards.pcm.side
ALSA lib pcm.c:2239:(snd_pcm_open_noupdate) Unknown PCM cards.pcm.hdmi
ALSA lib pcm.c:2239:(snd_pcm_open_noupdate) Unknown PCM cards.pcm.modem
ALSA lib pcm.c:2239:(snd_pcm_open_noupdate) Unknown PCM cards.pcm.phoneline
ALSA lib pcm_dmix.c:1022:(snd_pcm_dmix_open) unable to open slave
Cannot connect to server socket err = No such file or directory
Cannot connect to server request channel
jack server is not running or cannot be started
* recording
* done recording

いろいろalsaやportaudioからアラートは出ていますが、無事に録音できました。

PyAudioで再生を行う

PyAudioは再生ももちろんできるのですが… 公式サイトの再生のサンプルを使ってみます。

#!/usr/bin/env python
# -*- coding: utf-8 -*-

"""PyAudio Example: Play a WAVE file."""

import pyaudio
import wave
import sys

CHUNK = 1024

if len(sys.argv) < 2:
    print("Plays a wave file.\n\nUsage: %s filename.wav" % sys.argv[0])
    sys.exit(-1)

wf = wave.open(sys.argv[1], 'rb')

p = pyaudio.PyAudio()

stream = p.open(format=p.get_format_from_width(wf.getsampwidth()),
                channels=wf.getnchannels(),
                rate=wf.getframerate(),
                output=True)

data = wf.readframes(CHUNK)

while data != '':
    stream.write(data)
    data = wf.readframes(CHUNK)

stream.stop_stream()
stream.close()

p.terminate()

これを実行すると…

$ python pyaudio_sample_play.py output.wav
ALSA lib pcm_dmix.c:1022:(snd_pcm_dmix_open) unable to open slave
ALSA lib pcm.c:2239:(snd_pcm_open_noupdate) Unknown PCM cards.pcm.rear
ALSA lib pcm.c:2239:(snd_pcm_open_noupdate) Unknown PCM cards.pcm.center_lfe
ALSA lib pcm.c:2239:(snd_pcm_open_noupdate) Unknown PCM cards.pcm.side
ALSA lib pcm.c:2239:(snd_pcm_open_noupdate) Unknown PCM cards.pcm.hdmi
ALSA lib pcm.c:2239:(snd_pcm_open_noupdate) Unknown PCM cards.pcm.modem
ALSA lib pcm.c:2239:(snd_pcm_open_noupdate) Unknown PCM cards.pcm.phoneline
ALSA lib pcm_dmix.c:1022:(snd_pcm_dmix_open) unable to open slave
Cannot connect to server socket err = No such file or directory
Cannot connect to server request channel
jack server is not running or cannot be started

こちらもいろいろアラートが表示されますが、再生はできます…しかし、なんかノイズのっています。aplayで再生するとノイズが乗っていないので再生時にノイズがのっているようですが、原因はわかりませんでした。(処理能力などの問題でしょうか。)

単に再生するだけならpygameでも再生はできるのでそっちを使ってもいいかもしれません。(ループなど再生機能が多機能なので)

今回はpythonから録音ができたので、次は会話ができるように拡張をしていきたいと思います。

RaspberryPiで Cotogoto::Noby APIを使ってみる【ヒミツのクマちゃん その1】

RaspberryPiでCotogoto::Noby APIを使ってみる

前回のエントリではかなり尻切れトンボのような感じで終わってしまったのですが 今回はその続きになります。

今回もpythonからのアクセスになるので定番のライブラリであるrequestsを使用することになります。Snipetのサンプルである占いの機能を実装させてみます。

Noby APIでは会話だけでなくおみくじをひくことができます。API界隈では占いっぽいものもあるのですが、ほとんどが有料なのでそれに近いおみくじの機能はなかなかイケてると思っています。

以下のように記述します。

#!/usr/bin/env python
# -*- coding: utf-8 -*-

import requests
import json
import types

ENDPOINT = 'https://www.cotogoto.ai/webapi/noby.json'
MY_KEY = '【取得したAPIKEY】'

payload = {'text': 'おみくじ引きたいな。', 'app_key': MY_KEY}
r = requests.get(ENDPOINT, params=payload)
data = r.json()

response = data['text']
print "response: %s" %(response)

DoCoMoの雑談対話APIではPOSTメソッドでリクエストを送っていましたが、Noby APIではGETメソッドを使用するので敷居はかなり低くなります。特にArduinoやmbedなどでもサンプルに類似した形式で簡単に記述ができそうです。

送信したデータのtextにおみくじの内容が格納されているのでそれ使用することになります。 実際には以下のようなJSONデータがレスポンスとして返されます。

{
  "art": null,
  "commandId": "NOBY_004",
  "commandName": "おみくじ",
  "dat": "おはようございます",
  "emotion": {
    "angerFear": 0,
    "joySad": 0,
    "likeDislike": 0,
    "word": null
  },
  "emotionList": [],
  "loc": null,
  "mood": 0,
  "negaposi": 0,
  "negaposiList": [
    {
      "score": -0.30000001192092896,
      "word": "引き"
    }
  ],
  "org": null,
  "psn": null,
  "text": "小吉\r\nあなたの心を平和にして、他人のためにつくせば吉です。\r\nまずはあなたの家庭を平和にしましょう。\r\nそして、あなたの周りからだんだんに平和な気持ちを広げていきます。\r\nそうすれば、周りにどんな波風が立っても、あなたとその周囲だけには春風が吹きます。\r\nその春風を、また周囲に広げていきましょう。\r\n【願い事】他人のため、という気持ちがあればかないます。\r\n【待ち人】遅れますが来ます。\r\n【失し物】男の人に聞いてみましょう。\r\n【旅行】早い旅立ちがいいでしょう。\r\n【ビジネス】いいでしょう。\r\n【学問】もうちょっと勉強しましょう。\r\n【争い事】人に頼んだほうがうまくいきます。\r\n【恋愛】再出発もいいかも知れません。\r\n【縁談】あなたの心が晴れやかならば疑いは晴れてうまくいきます。\r\n【転居】問題ありません。\r\n【病気】いい医師に出会うよう努力しましょう。そうすれば治ります。",
  "tim": null,
  "type": "Command",
  "wordList": [
    {
      "feature": "名詞,一般,*,*,*,*,おみくじ,*,*,",
      "start": "0",
      "surface": "おみくじ"
    },
    {
      "feature": "動詞,自立,*,*,五段・カ行イ音便,連用形,引く,ヒキ,ヒキ,",
      "start": "1",
      "surface": "引き"
    },
    {
      "feature": "助動詞,*,*,*,特殊・タイ,基本形,たい,タイ,タイ,",
      "start": "2",
      "surface": "たい"
    },
    {
      "feature": "助詞,終助詞,*,*,*,*,な,ナ,ナ,",
      "start": "3",
      "surface": ""
    },
    {
      "feature": "記号,句点,*,*,*,*,。,*,。,",
      "start": "4",
      "surface": ""
    }
  ]
}

若干の難点としては結構文面が長いということでしょうか。文面は\r\nで区切られてるので、後は分割すれば使えます。個人的にはおみくじの結果よりも2文節目のフレーズのほうが占いっぽいのでいいかなと思います。

使えたけど…あんまりこれだけでは面白くない。

これではこれまでのサンプルをそのまま使っただけの糞エントリーになってしまうので、今回はもう少し発展させてみたいと思います。

今回はRaspberryPiにつけたカメラで人間の顔が認識できたら、おみくじを引いてフレーズを音声として出力させてみたいと思います。

顔の認識に関しては

uepon.hatenadiary.com

発話(TextToSpeach)に関しては

uepon.hatenadiary.com

といった過去のエントリーを思い出して行うことになります。

そして今回の一番の目玉は音声出力を行う「ヒミツのクマちゃん」になります。

これでぐっとサービスっぽくなります。本当は「BOCCO」とかが入手できるとまた違ったこともできるんですが… 「ヒミツのクマちゃん」はハッカソンで同じチームになった小林さんに教えてもらいました。ありがとうございます。

#!/usr/bin/env python
# -*- coding: utf-8 -*-

import requests
import json
import types
import time
import picamera
import os
import sys

SHORTSLEEP = 10
LONGSLEEP = 60

try:
  while True:
        # MS Emotion APIで顔の認識を行う
        with picamera.PiCamera() as camera:
                camera.start_preview()
                camera.hflip = True
                camera.vflip = True
                time.sleep(2) #カメラ初期化
                camera.capture('foo.jpg')

        url = 'https://api.projectoxford.ai/emotion/v1.0/recognize'
        headers = {'Content-type': 'application/octet-stream', 'Ocp-Apim-Subscription-Key':'【Emotion APIのキー】'}
        payload = open('./foo.jpg', 'rb').read()

        r = requests.post(url, data=payload, headers=headers)
        data = r.json()

        ninshiki = len(data)

        # 顔認識が出来たらNoby APIにアクセスしておみくじを引く

        if ninshiki > 0:
                dict = data[0]['scores']
                max_key = max(dict, key=(lambda x: dict[x]))

                print "key: %s,\t value:%f" %(max_key, dict[max_key])

                ENDPOINT = 'https://www.cotogoto.ai/webapi/noby.json'
                MY_KEY = '【Noby APIのキー】'

                payload = {'text': 'おみくじ引きたいな。', 'app_key': MY_KEY}
                r = requests.get(ENDPOINT, params=payload)
                data = r.json()

                response = data['text']
                # print "response: %s" %(response)

                uranai = response.split("\r\n")[1]
                print uranai

                # おみくじのフレーズを話す
                voice1 = 'こんにちは、今日は来てくれてありがとう。'
                voice2 = '今日の運勢を占うね。'

                # shを呼び出す。
                cmdtext = './jtalk.sh ' + uranai
                # print cmdtext

                os.system('./jtalk.sh ' + voice1) #成功すると0 # import os
                os.system('./jtalk.sh ' + voice2) #成功すると0 # import os
                os.system(cmdtext.encode('utf-8')) #成功すると0 # import os
                print 'LONG_SLEEP_MODE'
                time.sleep(LONGSLEEP)
        else:
                print 'SHORT_SLEEP_MODE'
                time.sleep(SHORTSLEEP)

except KeyboardInterrupt:
  sys.exit()

pythonから呼び出しているjtalk.shのshは以下の通り

#!/bin/bash

HTSVOICE=/usr/share/hts-voice/nitech-jp-atr503-m001/nitech_jp_atr503_m001.htsvoice
#HTSVOICE=/usr/share/hts-voice/mei/mei_normal.htsvoice

voice=`tempfile`
option="-m $HTSVOICE \
  -s 16000 \
  -p 100 \
  -a 0.03 \
  -u 0.0 \
  -jm 1.0 \
  -jf 1.0 \
  -x /var/lib/mecab/dic/open-jtalk/naist-jdic \
  -ow $voice"

if [ -z "$1" ] ; then
  open_jtalk $option
else
  if [ -f "$1" ] ; then
    open_jtalk $option $1
  else
    echo "$1" | open_jtalk $option
  fi
fi

aplay -q $voice
rm $voice

処理の流れとしては以下の様になっています。

  • RaspberryPIのカメラモジュールで画像を撮影
  • 撮影した画像データをEmoion APIへOctetStreamで送信し解析
  • 画像内に人の顔があれば、NobyAPIへおみくじを要求。
  • 画像内に人がいなければ、短時間のスリープ
  • おみくじ結果が得られたらjtalk.sh(OpenJTalkで話す機能をもつシェルスクリプト)の引数におみくじの結果をいれて長時間のスリープ
  • 以上を繰り返す

ネットワーク越しにAPIを叩いているので遅延があることは覚悟する必要はあります。気になる場合には機器を設置するシチュエーションでカバーすれば感覚として軽減はできそうです。(椅子を置いて座ってもらうなど)

実際に動かした状態は以下で


クマ占い

カメラの設置位置が難しいですが、専用の椅子やリュックなどを作成して自然に見せるのも楽しいかなと思います。

Cotogoto::Noby APIを使ってみる

Cotogoto::Noby APIを使ってみる

ハッカソンなどに参加していると会話系のAPIを使用する機会も増えてきます。以前紹介したDoCoMoさんの対話雑談APIも良いのですが 個人的にはもう少し個性のある会話エンジンのほうが楽しいと思っています。

そこで選択肢になるエンジンとしてはライフログであるコトゴトの機能の一部であるCotogoto::Noby APIが選択肢になることも多いようです(この表現であっているのだろうか)。特に名古屋近辺ではNobyの神様にあえるので、詳しく話を聞くこともできます。

Noby APIとは?

主な特徴としては

www.cotogoto.ai

サイト内の解説がかなり詳細なので、検索するよりメインサイトを確認するのが開発の近道になると思います。

PowershellCLIから使用してみる

f:id:ueponx:20161115041907j:plain

ログインして【登録はこちら(無料)】(緑色)のボタンを押すとConsumer Key(App Key)が取得できます。以下の画面上はみえないようにしています。

f:id:ueponx:20161115042418j:plain

これをメモっておきます。更に画面を下にスクロールさせるとCLIを使ったCode snipetがあるのでそれを使って実験をすることになります。

f:id:ueponx:20161115043016j:plain

今回、自分はWindowsPCを使用しているため純粋なcurlがつかえないので、Powershellで同じことを行ってみます。(PowerShellで使用するcurlInvoke-WebRequestのAliasになっています。)例えば、Code snipet#1と同じコードは以下のようになります。

PS C:\> curl -Uri "https://www.cotogoto.ai/webapi/noby.json?text=おはようございます&app_key=【取得したキー】" -Method GET

StatusCode        : 200
StatusDescription : OK
Content           : {"art":null,"commandId":null,"commandName":null,"dat":"おはようございます","loc":null,"mood":0.0,"n
                    egaposi":0.0,"negaposiList":[{"score":0.0,"word":"ござい"}],"org":null,"psn":null,"text":"おはよー
                    ございます","tim":null,"...
RawContent        : HTTP/1.1 200 OK
                    Pragma: no-cache
                    Transfer-Encoding: chunked
                    Cache-Control: no-cache
                    Content-Type: application/json;charset=UTF-8
                    Date: Mon, 14 Nov 2016 20:35:16 GMT
                    Expires: Tue, 29 Feb 2000 12:...
Forms             : {}
Headers           : {[Pragma, no-cache], [Transfer-Encoding, chunked], [Cache-Control, no-cache], [Content-Type, applic
                    ation/json;charset=UTF-8]...}
Images            : {}
InputFields       : {}
Links             : {}
ParsedHtml        : mshtml.HTMLDocumentClass
RawContentLength  : 390

このようになっていますがレスポンスのJSONデータをみると(先程の結果とは少し違っていますが^^;)

{
  "art": null,
  "commandId": null,
  "commandName": null,
  "dat": "おはようございます",
  "loc": null,
  "mood": 0,
  "negaposi": 0,
  "negaposiList": [
    {
      "score": 0,
      "word": "ござい"
    }
  ],
  "org": null,
  "psn": null,
  "text": "おはっよー",
  "tim": null,
  "type": "Greet",
  "wordList": [
    {
      "feature": "名詞,一般,*,*,*,*,おはようございます,*,*,",
      "start": "0",
      "surface": "おはようございます"
    }
  ]
}

textに格納されたデータがNobyAPIから返された会話データになります。Docomoの雑談対話APIに比べてムードやネガポジ判定がある点が面白いです。

詳しくはこちらを御覧ください。

www.cotogoto.ai

RaspberryPiでの使用に続く。

雑談対話APIを使ってみる

雑談対話APIを使ってみる

今回はこれまでとは毛色をかえてDoCoMoさんの雑談対話APIを使用してみようと思います。 最近はLINEなどのBotなどが使えるようになったりとBotのようなテキスト対話型の自動応答も必要性が上がってきたような気がします。また、Botではなくリアルなロボット(Pepperやロボホンなど)でも対話的に対応してほしい要求があります。

そんなときに使用できるのが、雑談に答えてくれるようなAPIになります。 ハッカソンでもこのような雑談APIが使われることが多くなっているような気がします。

そこで使い方をメモって置こうと思います。

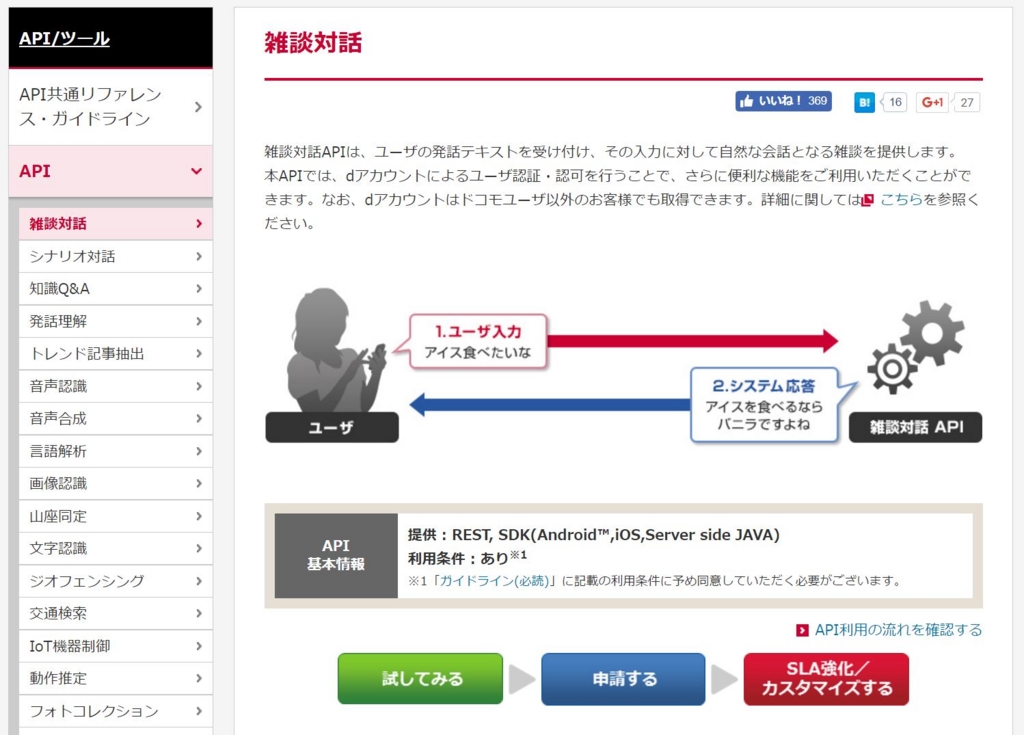
DoCoMoさんの雑談対話APIは以下を参照してください。

dev.smt.docomo.ne.jp

f:id:ueponx:20161115011709j:plain

基本的にはユーザから発せられるテキストをHTTPのPOSTメソッドを使用してJSON形式で送信することで、対話した形のテキストデータ(こちらもJSON形式)で返送されます。

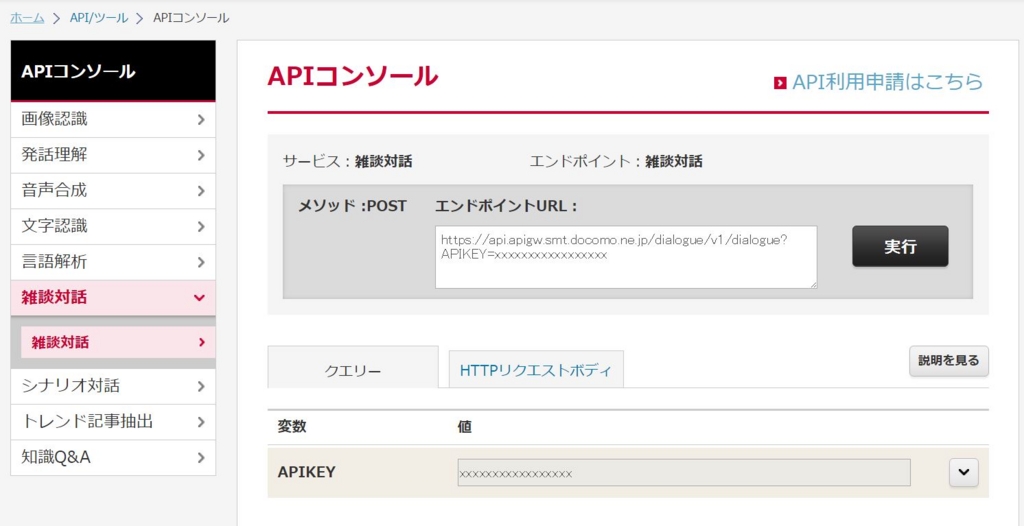
お手軽に試してみるには画面内にある【試して見る】を押してみます。するとAPIコンソールの画面が開きます。

f:id:ueponx:20161115014118j:plain

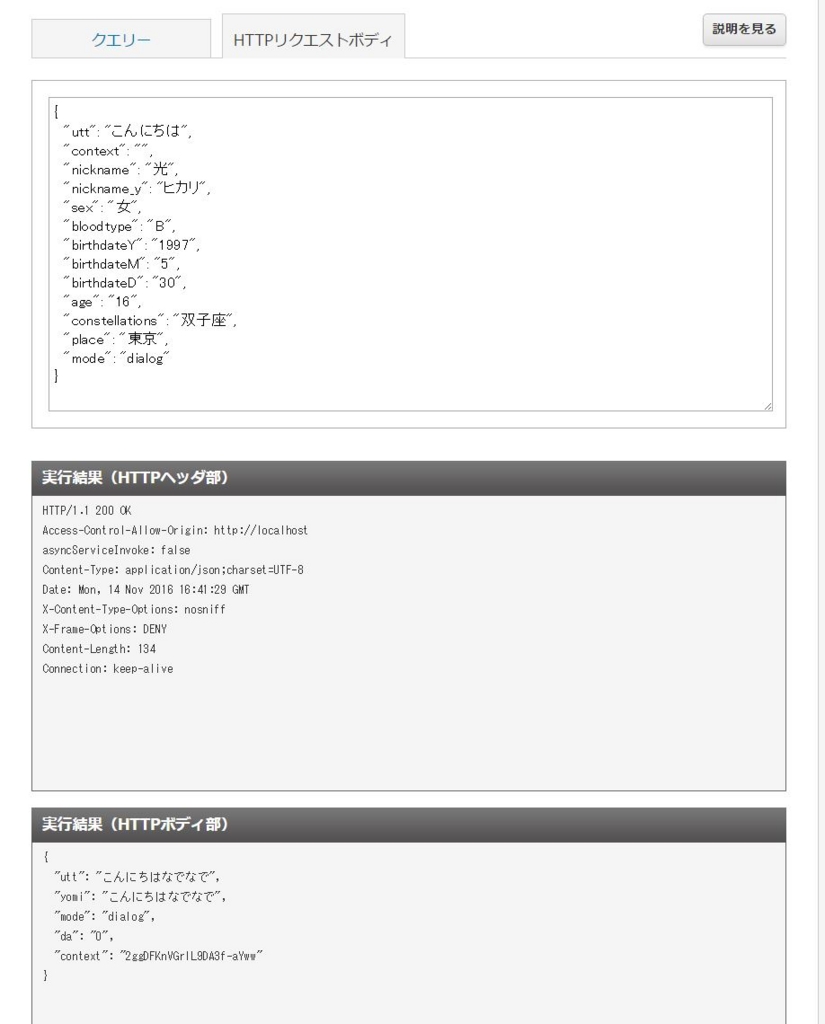
ここで実行ボタンをクリックすると画面の下部に実行結果が表示されます。

f:id:ueponx:20161115014646j:plain

説明のために【HTTPリクエストボディ】タブをクリックします。

このコンソール画面では雑談対話APIに対してAPIキーをダミーの値"xxxxxxxxxxx…"とし、jsonデータで対話データを送っています。

エンドポイントは

https://api.apigw.smt.docomo.ne.jp/dialogue/v1/dialogue

となるので、このエンドポイントにAPIKEYをクエリ形式で送信します。

https://api.apigw.smt.docomo.ne.jp/dialogue/v1/dialogue?APIKEY=【取得したAPIKEY】

ボディは以下のようなJSON形式になります。

{
  "utt": "こんにちは",
  "context": "",
  "nickname": "光",
  "nickname_y": "ヒカリ",
  "sex": "女",
  "bloodtype": "B",
  "birthdateY": "1997",
  "birthdateM": "5",
  "birthdateD": "30",
  "age": "16",
  "constellations": "双子座",
  "place": "東京",
  "mode": "dialog"
}

サンプルでは以上のデータになっていますが、ユーザの属性を与えている部分がほとんどで、必須になるのはuttの値だけなので以下のようなJSONデータでも実行可能です。

{
  "utt": "こんにちは"
}

uttに対話するテキストデータを入れることになります。すると以下のようなJSONデータが返送されます。

{
  "utt": "あらこんにちは",
  "yomi": "あらこんにちは",
  "mode": "dialog",
  "da": "0",
  "context": "XfjRobOGN_OFec2kr2JMHw"
}

データを見ればuttの値が対話されたデータになるのはわかるのですが、重要なのは contextになります。このAPIではデータを送るたびに会話の最初から開始されるので呼び出すごとに新しい会話になってしまいます。そこで、一度呼び出した結果に格納されるcontextの値をJSONデータに格納することで会話を継続した形で対話を行ってくれるようになります。

  • utt … ユーザの発話を入力します。255文字以下
  • context … システムから出力されたcontextを入力することにより会話を継続します。255文字以下

今回の例であればこの会話の流れを次に反映させるには

{
  "utt": "今日はいい天気ですね"
  "context": "XfjRobOGN_OFec2kr2JMHw"
}

と送信することになります。

pythonで雑談APIを使用してみる

折角なのでRaspberryPIのpythonをつかって雑談APIの機能を作ってみます。 ライブラリとしてはrequestsjsonのライブラリを使っています。

#!/usr/bin/env python
# -*- coding: utf-8 -*-

import requests
import json
import types

KEY = '【取得したAPIKEY】'

# 1回目の呼び出し(会話の開始)

endpoint = 'https://api.apigw.smt.docomo.ne.jp/dialogue/v1/dialogue?APIKEY=REGISTER_KEY'
url = endpoint.replace('REGISTER_KEY', KEY)

payload = {'utt' : 'こんにちは', 'context': ''}
headers = {'Content-type': 'application/json'}

r = requests.post(url, data=json.dumps(payload), headers=headers)
data = r.json()

response = data['utt']
context = data['context']
print "response: %s, context: %s" %(response, context)

# 2回目の呼び出し

payload['utt'] = response
payload['context'] = data['context']

r = requests.post(url, data=json.dumps(payload), headers=headers)
data = r.json()

response = data['utt']
context = data['context']

print "response: %s, context: %s" %(response, context)

こんな感じでしょうか。一回目の呼び出しで「こんにちは」と会話を開始し、2回目の呼び出しではその会話の継続としてオウム返しで文章を送っています。

$ ./docomo_zatsudan.py
response: お元気ですか, context: YtIzpLxIMZl5Wssue4ZQiQ
response: 最初のお小遣いは、500円だったかな。, context: YtIzpLxIMZl5Wssue4ZQiQ

なんとなく拙い感じもする会話になっていますが、属性の設定を行ったり、Twitterなどの文章で話しかければもう少し違う感じになりそうです。 また雑談APIでは読みがなも返されるので、読み上げ系の機能と連携も容易そうです。

おわりに

次回も雑談というか会話系のAPIを調べてみようと思います。

【続】Microsoft Emotion APIをRaspberryPiで使用してみる【picameraと連携】

(続)Microsoft Emotion APIをRaspberryPiで使用してみる【picameraと連携】

これまでのエントリーでMicrosoft Emotion APIの使い方がわかったことに味を占めてRaspberry Piのカメラモジュールで撮影した画像を送ることにします。これまでcameraモジュールは持っていたんですが、宝の持ち腐れだったので。

自分の持っていたcameraモジュールはこれになります。

いろいろとカメラモジュールはありますが、自分の持っているRaspberryPiに対応したモジュールでいいんじゃないかと思います。ただし、NoIRとついているものは赤外線カメラなのでその点だけ気を付けてください。(使い方は変わらないみたいですが。)

Raspberry Piのcameraモジュールを有効化する

まずはcameraモジュールを使用できるようにraspi-configで設定します。

$ sudo raspi-config

以下のようなメニュー画面になります。

f:id:ueponx:20161025002333j:plain

この中から【6.Enable Camera】を選択します。

f:id:ueponx:20161025002407j:plain

cameraを有効化するか否かを尋ねられるので、

f:id:ueponx:20161025002546j:plain

【Enable】を選択します。

f:id:ueponx:20161025002641j:plain

選択するともとのメニュー画面に戻ります。

f:id:ueponx:20161025002722j:plain

メニューの下にある【Finish】を押して設定を終了させようとすると

f:id:ueponx:20161025002809j:plain

再起動を求められるので、再起動をします。

f:id:ueponx:20161025002837j:plain

これで正常にcameraモジュールを有効化できました。

cameraモジュールのテストを行う。

有効化したら以下のコマンドを実行してみます。

$ raspistill -o image.jpg

エラーが発生しなければOKです。 念のため生成された画像がjpegファイルになっているか確認してみます。

$ file image.jpg
image.jpg: JPEG image data, Exif standard: [TIFF image data, big-endian, direntries=10, height=0, manufacturer=RaspberryPi, model=RP_ov5647, xresolution=156, yresolution=164, resolutionunit=2, datetime=2016:10:24 23:36:00, width=0], baseline, precision 8, 720x480, frames 3

fileコマンドはファイルの解析ができるコマンドです。 デフォルト設定では720x480サイズで撮影され、Exif情報もちゃんと入っているので問題無いようです。

raspistillは静止画をキャプチャするコマンドですが、他にもraspividという動画撮影用のコマンドや圧縮をかけずにキャプチャを行うようなraspiyuvというコマンドも存在します。これらコマンドはシャッタースピードやホワイトバランス、簡易なフィルタなどをかける事ができるかなり多機能なコマンドになっています。このコマンドだけでもタイムラプスを取ることができるので、別途そのあたりも調べてみたいと思います。

それぞれのコマンドのhelpオプションは以下の通り。

$ raspistill --help
Runs camera for specific time, and take JPG capture at end if requested

usage: raspistill [options]

Image parameter commands

-?, --help      : This help information
-w, --width     : Set image width <size>
-h, --height    : Set image height <size>
-q, --quality   : Set jpeg quality <0 to 100>
-r, --raw       : Add raw bayer data to jpeg metadata
-o, --output    : Output filename <filename> (to write to stdout, use '-o -'). If not specified, no file is saved
-l, --latest    : Link latest complete image to filename <filename>
-v, --verbose   : Output verbose information during run
-t, --timeout   : Time (in ms) before takes picture and shuts down (if not specified, set to 5s)
-th, --thumb    : Set thumbnail parameters (x:y:quality) or none
-d, --demo      : Run a demo mode (cycle through range of camera options, no capture)
-e, --encoding  : Encoding to use for output file (jpg, bmp, gif, png)
-x, --exif      : EXIF tag to apply to captures (format as 'key=value') or none
-tl, --timelapse        : Timelapse mode. Takes a picture every <t>ms. %d == frame number (Try: -o img_%04d.jpg)
-fp, --fullpreview      : Run the preview using the still capture resolution (may reduce preview fps)
-k, --keypress  : Wait between captures for a ENTER, X then ENTER to exit
-s, --signal    : Wait between captures for a SIGUSR1 from another process
-g, --gl        : Draw preview to texture instead of using video render component
-gc, --glcapture        : Capture the GL frame-buffer instead of the camera image
-set, --settings        : Retrieve camera settings and write to stdout
-cs, --camselect        : Select camera <number>. Default 0
-bm, --burst    : Enable 'burst capture mode'
-md, --mode     : Force sensor mode. 0=auto. See docs for other modes available
-dt, --datetime : Replace output pattern (%d) with DateTime (MonthDayHourMinSec)
-ts, --timestamp        : Replace output pattern (%d) with unix timestamp (seconds since 1970)
-fs, --framestart       : Starting frame number in output pattern(%d)
-rs, --restart  : JPEG Restart interval (default of 0 for none)

Preview parameter commands

-p, --preview   : Preview window settings <'x,y,w,h'>
-f, --fullscreen        : Fullscreen preview mode
-op, --opacity  : Preview window opacity (0-255)
-n, --nopreview : Do not display a preview window

Image parameter commands

-sh, --sharpness        : Set image sharpness (-100 to 100)
-co, --contrast : Set image contrast (-100 to 100)
-br, --brightness       : Set image brightness (0 to 100)
-sa, --saturation       : Set image saturation (-100 to 100)
-ISO, --ISO     : Set capture ISO
-vs, --vstab    : Turn on video stabilisation
-ev, --ev       : Set EV compensation - steps of 1/6 stop
-ex, --exposure : Set exposure mode (see Notes)
-awb, --awb     : Set AWB mode (see Notes)
-ifx, --imxfx   : Set image effect (see Notes)
-cfx, --colfx   : Set colour effect (U:V)
-mm, --metering : Set metering mode (see Notes)
-rot, --rotation        : Set image rotation (0-359)
-hf, --hflip    : Set horizontal flip
-vf, --vflip    : Set vertical flip
-roi, --roi     : Set region of interest (x,y,w,d as normalised coordinates [0.0-1.0])
-ss, --shutter  : Set shutter speed in microseconds
-awbg, --awbgains       : Set AWB gains - AWB mode must be off
-drc, --drc     : Set DRC Level (see Notes)
-st, --stats    : Force recomputation of statistics on stills capture pass
-a, --annotate  : Enable/Set annotate flags or text
-3d, --stereo   : Select stereoscopic mode
-dec, --decimate        : Half width/height of stereo image
-3dswap, --3dswap       : Swap camera order for stereoscopic
-ae, --annotateex       : Set extra annotation parameters (text size, text colour(hex YUV), bg colour(hex YUV))


Notes

Exposure mode options :
off,auto,night,nightpreview,backlight,spotlight,sports,snow,beach,verylong,fixedfps,antishake,fireworks

AWB mode options :
off,auto,sun,cloud,shade,tungsten,fluorescent,incandescent,flash,horizon

Image Effect mode options :
none,negative,solarise,sketch,denoise,emboss,oilpaint,hatch,gpen,pastel,watercolour,film,blur,saturation,colourswap,washedout,posterise,colourpoint,colourbalance,cartoon

Metering Mode options :
average,spot,backlit,matrix

Dynamic Range Compression (DRC) options :
off,low,med,high

Preview parameter commands

-gs, --glscene  : GL scene square,teapot,mirror,yuv,sobel
-gw, --glwin    : GL window settings <'x,y,w,h'>
$ raspivid --help
Display camera output to display, and optionally saves an H264 capture at requested bitrate

usage: raspivid [options]

Image parameter commands

-?, --help      : This help information
-w, --width     : Set image width <size>. Default 1920
-h, --height    : Set image height <size>. Default 1080
-b, --bitrate   : Set bitrate. Use bits per second (e.g. 10MBits/s would be -b 10000000)
-o, --output    : Output filename <filename> (to write to stdout, use '-o -')
-v, --verbose   : Output verbose information during run
-t, --timeout   : Time (in ms) to capture for. If not specified, set to 5s. Zero to disable
-d, --demo      : Run a demo mode (cycle through range of camera options, no capture)
-fps, --framerate       : Specify the frames per second to record
-e, --penc      : Display preview image *after* encoding (shows compression artifacts)
-g, --intra     : Specify the intra refresh period (key frame rate/GoP size). Zero to produce an initial I-frame and then just P-frames.
-pf, --profile  : Specify H264 profile to use for encoding
-td, --timed    : Cycle between capture and pause. -cycle on,off where on is record time and off is pause time in ms
-s, --signal    : Cycle between capture and pause on Signal
-k, --keypress  : Cycle between capture and pause on ENTER
-i, --initial   : Initial state. Use 'record' or 'pause'. Default 'record'
-qp, --qp       : Quantisation parameter. Use approximately 10-40. Default 0 (off)
-ih, --inline   : Insert inline headers (SPS, PPS) to stream
-sg, --segment  : Segment output file in to multiple files at specified interval <ms>
-wr, --wrap     : In segment mode, wrap any numbered filename back to 1 when reach number
-sn, --start    : In segment mode, start with specified segment number
-sp, --split    : In wait mode, create new output file for each start event
-c, --circular  : Run encoded data through circular buffer until triggered then save
-x, --vectors   : Output filename <filename> for inline motion vectors
-cs, --camselect        : Select camera <number>. Default 0
-set, --settings        : Retrieve camera settings and write to stdout
-md, --mode     : Force sensor mode. 0=auto. See docs for other modes available
-if, --irefresh : Set intra refresh type
-fl, --flush    : Flush buffers in order to decrease latency
-pts, --save-pts        : Save Timestamps to file for mkvmerge
-cd, --codec    : Specify the codec to use - H264 (default) or MJPEG
-lev, --level   : Specify H264 level to use for encoding


H264 Profile options :
baseline,main,high


H264 Level options :
4,4.1,4.2

H264 Intra refresh options :
cyclic,adaptive,both,cyclicrows

Preview parameter commands

-p, --preview   : Preview window settings <'x,y,w,h'>
-f, --fullscreen        : Fullscreen preview mode
-op, --opacity  : Preview window opacity (0-255)
-n, --nopreview : Do not display a preview window

Image parameter commands

-sh, --sharpness        : Set image sharpness (-100 to 100)
-co, --contrast : Set image contrast (-100 to 100)
-br, --brightness       : Set image brightness (0 to 100)
-sa, --saturation       : Set image saturation (-100 to 100)
-ISO, --ISO     : Set capture ISO
-vs, --vstab    : Turn on video stabilisation
-ev, --ev       : Set EV compensation - steps of 1/6 stop
-ex, --exposure : Set exposure mode (see Notes)
-awb, --awb     : Set AWB mode (see Notes)
-ifx, --imxfx   : Set image effect (see Notes)
-cfx, --colfx   : Set colour effect (U:V)
-mm, --metering : Set metering mode (see Notes)
-rot, --rotation        : Set image rotation (0-359)
-hf, --hflip    : Set horizontal flip
-vf, --vflip    : Set vertical flip
-roi, --roi     : Set region of interest (x,y,w,d as normalised coordinates [0.0-1.0])
-ss, --shutter  : Set shutter speed in microseconds
-awbg, --awbgains       : Set AWB gains - AWB mode must be off
-drc, --drc     : Set DRC Level (see Notes)
-st, --stats    : Force recomputation of statistics on stills capture pass
-a, --annotate  : Enable/Set annotate flags or text
-3d, --stereo   : Select stereoscopic mode
-dec, --decimate        : Half width/height of stereo image
-3dswap, --3dswap       : Swap camera order for stereoscopic
-ae, --annotateex       : Set extra annotation parameters (text size, text colour(hex YUV), bg colour(hex YUV))


Notes

Exposure mode options :
off,auto,night,nightpreview,backlight,spotlight,sports,snow,beach,verylong,fixedfps,antishake,fireworks

AWB mode options :
off,auto,sun,cloud,shade,tungsten,fluorescent,incandescent,flash,horizon

Image Effect mode options :
none,negative,solarise,sketch,denoise,emboss,oilpaint,hatch,gpen,pastel,watercolour,film,blur,saturation,colourswap,washedout,posterise,colourpoint,colourbalance,cartoon

Metering Mode options :
average,spot,backlit,matrix

Dynamic Range Compression (DRC) options :
off,low,med,high
$ raspiyuv --help
Runs camera for specific time, and take uncompressed YUV capture at end if requested

usage: raspiyuv [options]

Image parameter commands

-?, --help      : This help information
-w, --width     : Set image width <size>
-h, --height    : Set image height <size>
-o, --output    : Output filename <filename>. If not specifed, no image is saved
-v, --verbose   : Output verbose information during run
-t, --timeout   : Time (in ms) before takes picture and shuts down. If not specified set to 5s
-tl, --timelapse        : Timelapse mode. Takes a picture every <t>ms
-rgb, --rgb     : Save as RGB data rather than YUV
-cs, --camselect        : Select camera <number>. Default 0
-fp, --fullpreview      : Run the preview using the still capture resolution (may reduce preview fps)
-l, --latest    : Link latest complete image to filename <filename>
-k, --keypress  : Wait between captures for a ENTER, X then ENTER to exit
-s, --signal    : Wait between captures for a SIGUSR1 from another process
-set, --settings        : Retrieve camera settings and write to stdout
-bm, --burst    : Enable 'burst capture mode'

Preview parameter commands

-p, --preview   : Preview window settings <'x,y,w,h'>
-f, --fullscreen        : Fullscreen preview mode
-op, --opacity  : Preview window opacity (0-255)
-n, --nopreview : Do not display a preview window

Image parameter commands

-sh, --sharpness        : Set image sharpness (-100 to 100)
-co, --contrast : Set image contrast (-100 to 100)
-br, --brightness       : Set image brightness (0 to 100)
-sa, --saturation       : Set image saturation (-100 to 100)
-ISO, --ISO     : Set capture ISO
-vs, --vstab    : Turn on video stabilisation
-ev, --ev       : Set EV compensation - steps of 1/6 stop
-ex, --exposure : Set exposure mode (see Notes)
-awb, --awb     : Set AWB mode (see Notes)
-ifx, --imxfx   : Set image effect (see Notes)
-cfx, --colfx   : Set colour effect (U:V)
-mm, --metering : Set metering mode (see Notes)
-rot, --rotation        : Set image rotation (0-359)
-hf, --hflip    : Set horizontal flip
-vf, --vflip    : Set vertical flip
-roi, --roi     : Set region of interest (x,y,w,d as normalised coordinates [0.0-1.0])
-ss, --shutter  : Set shutter speed in microseconds
-awbg, --awbgains       : Set AWB gains - AWB mode must be off
-drc, --drc     : Set DRC Level (see Notes)
-st, --stats    : Force recomputation of statistics on stills capture pass
-a, --annotate  : Enable/Set annotate flags or text
-3d, --stereo   : Select stereoscopic mode
-dec, --decimate        : Half width/height of stereo image
-3dswap, --3dswap       : Swap camera order for stereoscopic
-ae, --annotateex       : Set extra annotation parameters (text size, text colour(hex YUV), bg colour(hex YUV))


Notes

Exposure mode options :
off,auto,night,nightpreview,backlight,spotlight,sports,snow,beach,verylong,fixedfps,antishake,fireworks

AWB mode options :
off,auto,sun,cloud,shade,tungsten,fluorescent,incandescent,flash,horizon

Image Effect mode options :
none,negative,solarise,sketch,denoise,emboss,oilpaint,hatch,gpen,pastel,watercolour,film,blur,saturation,colourswap,washedout,posterise,colourpoint,colourbalance,cartoon

Metering Mode options :
average,spot,backlit,matrix

Dynamic Range Compression (DRC) options :
off,low,med,high

Emotion APIと連携してみる

では、raspistillで画像保存後にcurlコマンドでEmotion APIをKickしてみたいと思います。

Microsoftのサンプルをそのままみると…以下のように書けばいいようです。

参照:Microsoft Cognitive Services

#!/usr/bin/env bash
curl -X POST "https://api.projectoxford.ai/emotion/v1.0/recognize" -H "Content-Type: application/json" -H "Ocp-Apim-Subscription-Key: 発行されたAPIキー" --data-ascii "{'url':'http://www.mis.med.akita-u.ac.jp/~kata/image/lenna/lenna'}"

このサンプルではWeb上の画像を解析するだけなので、cameraモジュールで撮影したファイルをAPIで解析するにはOctet-Streamで送信する必要がありますので、以下のように変更します。

#!/usr/bin/env bash
raspistill -rot 180 -o image.jpg
curl -X POST "https://api.projectoxford.ai/emotion/v1.0/recognize" -H "Content-Type: application/octet-stream" -H "Ocp-Apim-Subscription-Key: 発行されたAPIキー" --data-binary @image.jpg

サンプルとの大きな違いは

  1. Content-TypeをOctet-Streamにした点
  2. --data-binary @image.jpgでContent-bodyを撮影したファイルにしている点

です。

このようにしてraspistillコマンドで撮影した画像をEmotion APIへ送信できます。

結果をみると

[{"faceRectangle":{"height":460,"left":1133,"top":756,"width":460},"scores":{"anger":0.0148205226,"contempt":0.0202304367,"disgust":0.00199702079,"fear":0.000178213842,"happiness":0.0006098823,"neutral":0.946034551,"sadness":0.013939213,"surprise":0.00219016313}}]

上記のようなJSONデータが帰ってきています。

ちなみにraspistillコマンドに-rot 180というオプションを指定していますが、cameraモジュールをフィルムケーブルを指す部分がモジュールの下部になり、 安定しておこうとすると、カメラの上下が反対になってしまうので入れているだけです。実際にはraspistill -o image.jpgで問題ありません。 MicrosoftのEmotion APIは顔が上下反対になっていたりすると認識できないようなのでそれに対する手になります。

やっほい!うまくいきました!

所詮shじゃん?もう少しなんとかならないの?

ですよね~。ってことでpythonからも触れるようにしたいと思います。

pythonからcameraモジュールを制御してみる

pythonからcameraモジュールにアクセスするためにpicameraというモジュールを導入します。詳しくは以下のサイトを参考にします。

参照:Python picamera - Raspberry Pi Documentation

参照:Documentation for picamera — Picamera 1.2 documentation

picameraをインストールする

pipでもいいのですが、Raspberry Piなのでapt-getでインストールすることにします。

$ sudo apt-get install python-picamera

これで完了です。もしpipでインストールするなら以下の様になるかと思います。(これでいいはず…)

$ sudo pip install picamera

対話型のインターフェースでimportしてみてエラーが出なければ正常にインストールできています。

$ python
Python 2.7.9 (default, Mar  8 2015, 00:52:26)
[GCC 4.9.2] on linux2
Type "help", "copyright", "credits" or "license" for more information.
>>> import picamera
>>>

picameraを使用してみる

picameraのインポートが成功したのでpythonで撮影したカメラ画像をEmotionAPIに送ってみましょう。途中のコードに

with picamera.PiCamera() as camera:
        camera.start_preview()
        camera.hflip = True
        camera.vflip = True
        time.sleep(2) #カメラ初期化
        camera.capture('foo.jpg')

となっている部分がありますが、この部分がカメラ撮影をしてfoo.jpgというファイルに出力している部分です。hflipとvfilpの設定がありますが、カメラの置き方によって画像の方向が変わる可能性があるので、適宜変更してください。ちなみにEmotionAPIでは顔が正しい上下関係頭が上で顎が下になっているような画像でないと正しい結果を返さないので注意が必要です。(くどいですが)

#!/usr/bin/env python
# -*- coding: utf-8 -*-

import requests
import json
import types
import time
import picamera

with picamera.PiCamera() as camera:
        camera.start_preview()
        camera.hflip = True
        camera.vflip = True
        time.sleep(2) #カメラ初期化
        camera.capture('foo.jpg')

url = 'https://api.projectoxford.ai/emotion/v1.0/recognize'
headers = {'Content-type': 'application/octet-stream', 'Ocp-Apim-Subscription-Key':'発行されたAPIキー'}
payload = open('./foo.jpg', 'rb').read()

r = requests.post(url, data=payload, headers=headers)
data = r.json()
dict = data[0]['scores']
max_key = max(dict, key=(lambda x: dict[x]))

print "key: %s,\t value:%f" %(max_key, dict[max_key])

後は、過去のエントリーと概ね変わりはないと思います。

uepon.hatenadiary.com

これでRaspberryPiとカメラがあれば表情を読みとりGPIOを制御するなんてこともできそうですね。次はそういうのを作ってみたいと思います。

/* -----codeの行番号----- */